This is a first part of a series of posts that aim to help to understand how we can build a game in cocos2d using MVC pattern (or its variation adapted to cocos2d programming model). This is a follow up post to the previous posts that I wrote some time ago so if you haven't read it before I suggest to at least read the first part which explains a bit of a theory.
Scenario
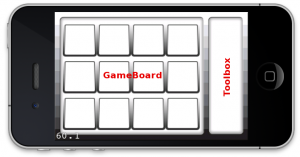
We are going to build a simple "framework" for building board puzzle games. This framework will be used in my new game and its core functionalities are as follows:
- A game board is defined by a number of rows and columns, which may vary for different application levels.
- The game board stores game pieces, and each game board's space can contain only one game piece.
- The game board can be initialized with a number of "fixed" game pieces that cannot be moved by a player during the game.
- A toolbox is defined by a number of toolbox items that represents slots for movable game pieces.
- Toolbox item (slot) can contain many toolbox items of the same type.
- Game pieces can be moved from the toolbox item (slot) and put on the game board.
Basic concepts
From wikipedia:
The model manages the behaviour and data of the application domain, responds to requests for information about its state (usually from the view), and responds to instructions to change state (usually from the controller). In event-driven systems, the model notifies observers (usually views) when the information changes so that they can react.
The view renders the model into a form suitable for interaction, typically a user interface element. Multiple views can exist for a single model for different purposes. A viewport typically has a one to one correspondence with a display surface and knows how to render to it.
The controller receives user input and initiates a response by making calls on model objects. A controller accepts input from the user and instructs the model and a viewport to perform actions based on that input.
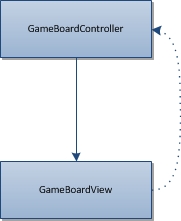
Following the definition from wikipedia we can identify the following main classes (we will add the model later on):
- GameBoardView that represents the main view of an application,
- GameBoardController that represents a controller for GameBoardView.
Please notice that the solid line represents a direct association (controller holds a reference to the view), the dashed line is an indirect association (via observer). The indirect association will be used later on to implement touches.
Implementation
Project structure
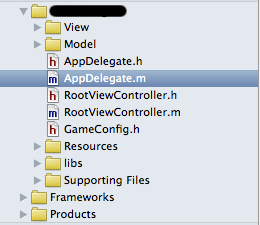
After creating a new project in XCode 4 based on a default cocos2d template we create the following groups:
- View - views & controller classes (you can also divide it into two different groups but I like to keep it in the same place as those classes are tightly connected).
- Model - we will use it later for storing model classes.
GameBoardView implementation
We start with GameBoardView implementation. We make GameBoardView extend CCNode.
@interface GameBoardView : CCNode {
}
Then we implement init method of GameBoardView and we do some drawing here to check if everything works fine.
- (id)init {
    if ((self = [super init])) {
        // create and initialize a Label
	CCLabelTTF *label = [CCLabelTTF labelWithString:@"Hello World from view" fontName:@"Marker Felt" fontSize:48];

	// ask director the the window size
	CGSize size = [[CCDirector sharedDirector] winSize];

	// position the label on the center of the screen
	label.position =  ccp( size.width /2 , size.height/2 );

	// add the label as a child to this Layer
	[self addChild: label];
    }

    return self;
}
GameBoardController implementation
GameBoardController is responsible for initializing the view. It also holds a reference to GameBoardView for future needs.
@interface GameBoardController : CCNode {
    GameBoardView *view;
}
Because GameBoardController extends CCNode we can add GameBoardView as a child of GameBoardController.
- (id)init {
    if ((self = [super init])) {
        view = [GameBoardView node];

        [self addChild:view];
    }

    return self;
}
Final modifications
We modify AppDelegate and we run our newly created controller:
[[CCDirector sharedDirector] runWithScene: [GameBoardController node]];And here it is for now. When you run your project the effect should be quite similar to default cocos2d template behavior. The difference is that we created a part of MVC project skeleton ready to implement necessary application logic.
Next steps
The project structure at this point is ready to introduce more advanced concepts:
- Handling touches.
- Introducing model.


